Everything you need to get started with ConnectMachine: digital business cards, contact management, team branding, custom domains, webhooks, and AI networking. Scroll through or use the sidebar to jump to any topic.
01 · Introduction
What is ConnectMachine?
ConnectMachine is the AI-powered digital business card and contact manager built for people who network with intent, not noise. Create multiple virtual cards, scan paper cards in seconds, and let your private AI agent recall who you met, when, and why it mattered.
i
What you will find here
These guides explain how features work in the app: what they mean, why they are useful, and the steps to use them. Continue scrolling or use the sidebar to jump to team branding, custom domains, webhooks, and more.
02 · Quick start
How do I get started with ConnectMachine?
New to ConnectMachine? Follow these steps to set up your account and make your first connection.
1Download the app from the App Store or Google Play and sign in with email or phone.
2Create your first card using a template. AI will enrich your details automatically, or you can fill in the details manually.
3Add it to Apple Wallet/Google Wallet (iOS/Android) for one-tap access from your lock screen.
4Share your card via QR code, link, and social media. The other person does not need the app.
03 · Cards screen
What is the Cards screen in ConnectMachine?
Everything about your digital business cards lives in the Cards screen in the ConnectMachine app. Create cards, customize them for different audiences, edit details, set up branding, and share, all from one place.
How do I create a digital business card?
Your first card is created during onboarding. You can add more cards anytime for different contexts.
1Open the Cards screen in the ConnectMachine app.
2Tap Create Card to start a new card. You can create multiple cards for different contexts.
3Fill in your details: name, title, company, phone, email, website, and social links.
4Choose card theme to match your brand or personal style.
5Preview and save. Your card is ready to share immediately.
!
Tip
Start with one complete card, then duplicate or create additional cards once you know which contexts you share in most often.
Why should I create multiple cards?
One card works for casual use, but most professionals benefit from creating more than one. Each card can show different information to different audiences.
Card type
When to use it
Example fields to show
Work
Meetings, conferences, and professional networking
Work email, office phone, LinkedIn, company website
Personal
Social events, friends, and informal connections
Personal phone, Instagram, casual bio
Events
Trade shows, meetups, or one-off conferences
Event-specific title, calendar link, short pitch
VIP / Inner circle
Trusted contacts who need your direct line
Direct mobile, personal email, messaging links
And more...
For any other context you need a card for
Custom fields, different contact details, etc.
Share the right context: A investor pitch event card should not expose your personal number.
Keep branding consistent: Use the same logo, colors, and company name across cards while varying visible fields.
Update once, sync everywhere: Edit shared details on a card and all past shares reflect the change.
How do I add a calendar to my card?
You can add your calendar to your cards to show your availability and schedule meetings with your contacts.
1Open the Cards screen and select the card you want to add calendar to.
2Tap Edit and open the edit screen to add the calendar
3Tap on the Calendar field to enter the public calendar URL.
4Tap on the Save button to save the changes.
How do I customize card branding?
Card branding is how your digital business card looks and feels. From the Cards screen, you can customize visuals so your card matches your personal or company identity.
Element
What you can do
Profile picture
Add or update your headshot so people recognize you when they open your card.
Cover image
Set a banner or background image that sets the tone for your card layout.
Company logo
Upload your organization's logo to reinforce brand identity on work and team cards.
Company color theme
Apply your brand colors so accents, buttons, and highlights match your company palette.
1Open the Cards screen and select the card you want to brand.
2Tap Edit and open the branding or design options for that card.
3Update your profile picture, cover image, logo, or color theme using the options shown in the editor.
4Preview the card to see how branding looks on the live view and same card will look at CM page.
5Save your changes. Updates appear on your card link, QR code, and Wallet pass.
i
What is CM page?
When someone opens your card link in a web browser, it shows your CM (ConnectMachine) page, which is the page with all your details and branding.
Profile picture: Use a high-resolution PNG, JPG, or SVG. (1:1 ratio recommended)
Banner: Choose a wide image that crops well on mobile and desktop. (16:9 ratio recommended)
Logo: Use a high-resolution PNG, JPG, or SVG without background or transparent background.
Brand colors: Pick a brand color with enough contrast for buttons and links.
Consistency: Apply branding at the team level so new members inherit it automatically.
How do I share my digital business card?
ConnectMachine gives you several ways to share. Pick the method that fits the moment. Recipients can view and save your details without downloading the app.
Method
How it works
QR code
Show your on-screen QR code. They scan with their camera and your card opens instantly.
Share link
Send your unique URL via text, email, or any messaging app.
Social media
Share your card directly to social media platforms like LinkedIn, X, and more.
Email
Send your card directly to someone's email address.
Apple Wallet
Add your card to Wallet for lock-screen access and quick sharing at events. Also you can customize the color of the card in Apple Wallet.
Google Wallet
Add your card to Google Wallet for lock-screen access and quick sharing at events. Also you can customize the color of the card in Google Wallet.
Home Widget
Add your card to Home Widget for quick sharing at events.
Offline QR Mode
Scan QR codes offline without internet connection.
1Open the card you want to share.
2Tap Share and choose QR, link, social media, email, Apple Wallet, or Google Wallet.
3Confirm the right card is selected if you have multiple cards.
4Let them save. They can add your details to their contacts in one tap.
How do I quick-share with the Home Widget?
Keep your card one tap away. Add the ConnectMachine widget to your home screen and share your details instantly no need to open the app.
1From your device's home screen, open the widget screen and add the ConnectMachine widget.
2In the app, open any card and go to the Share Your Card screen.
3Tap Add Card to Home Widget to add the card to your home screen.
4Your card now appears in the widget, ready for quick sharing straight from your home screen.
i
Always up to date
The widget auto-updates based on the last card you opened, so the right card is always ready to share.
How do I archive or delete cards?
Keep your card list tidy by archiving cards you don't use often, or remove them entirely when you no longer need them.
Delete Card - Remove a card from your list permanently.
1Open the card and go to the Edit Card screen.
2Tap Delete Card and confirm.
Archive Card - Archive a card from your list temporarily.
1Open the card and go to the Edit Card screen.
2Tap Archive Card. The card moves to your archived list and you can unarchive it anytime.
3To view archived cards, scroll to the bottom of your card list and tap the Archived Cards button. This shows all your archived cards.
4To bring a card back, open it from the archived list and tap Unarchive to move it back to your main list.
!
Important Notes
You can archive or delete a card only if you have more than one card. Your last remaining card can't be archived or deleted. If the card you're deleting has saved contacts, the confirmation screen includes a "Permanently delete contacts" option that is ticked by default. If you leave it ticked, those contacts are deleted along with the card. To keep your contacts, untick this option before confirming.
04 · Contacts
How do I scan and save contacts?
Received a paper business card? Point your camera and ConnectMachine's AI reads it for you. Names, titles, phone numbers, and emails are extracted and saved as a clean contact entry.
1Open the scanner from the bottom navigation bar or add contact manually from Contacts screen while clicking on + button.
2Point your camera at the business card and capture the image.
3Review extracted fields and correct anything the AI missed.
4Save to your network. The contact is searchable and ready for notes and follow-up.
i
No internet? No problem.
You can still scan cards while offline. Each scan is saved to a queue, and ConnectMachine automatically processes them once you're back online so you never miss a contact.
06 · LinkedIn
How do I connect with LinkedIn?
Scan someone's LinkedIn QR code and ConnectMachine instantly captures them as a contact complete with their profile link and enriched public details.
1Open the scanner and point your camera at the person's LinkedIn QR code.
2ConnectMachine saves them as a new contact in your network.
3The contact includes a link to their LinkedIn profile tap it to open their profile directly in LinkedIn.
4ConnectMachine automatically enriches the contact with publicly available data, all stored alongside the LinkedIn profile inside the contact.
i
Everything in one place
The LinkedIn link and enriched public data are saved directly to the contact in ConnectMachine, so you have a complete picture without leaving the app.
05 · External
How do I use WhatsApp with ConnectMachine?
Use ConnectMachine directly in WhatsApp to add contacts without opening the app. Share a photo of a business card, paper note, or any snap, and AI extracts the details and saves them to your ConnectMachine account.
1Open WhatsApp and start a chat with ConnectMachine on this number +1 (555) 748-0374.
2Share a photo of a business card, paper note, event badge, or any image with contact details.
3Let AI process the image. ConnectMachine reads the content and creates or updates the contact in your app.
4Open the ConnectMachine app to review the new contact in your network.
What to share
How it helps
Business cards
Snap a card at an event or meeting and add the person to your network in seconds.
Paper notes
Photograph handwritten details, sticky notes, or printed sheets and let AI capture the fields.
Any contact image
Share screenshots, badges, or other images with names, emails, or phone numbers.
i
Works outside the app
WhatsApp is an external channel. You do not need to be inside ConnectMachine to capture a contact. Message "Hi" on WhatsApp, send your snap, and the contact appears in the app when processing is complete.
How do I import contacts into ConnectMachine?
Bring your existing contacts into ConnectMachine in just a few taps, from wherever they live.
How do I import contacts from my phone, Google, or a file?
Open the ⋮ (triple-dot) menu on the contacts screen and choose Import Contacts. You can import from:
Phone book, your device's address book
Google account, your Gmail contacts
CSV / VCF file, a contacts file you upload
What contact fields get imported?
ConnectMachine imports the exact contents of your contacts. If an imported contact has fields that aren't part of the standard ConnectMachine contact form, those extra fields are kept and shown on the contact and you can edit or delete them.
i
Example
The standard form doesn't include a birthday field. If an imported contact has one, that birthday field will appear on the contact so nothing is lost.
How do I map CSV columns when importing contacts?
When you import a CSV file, ConnectMachine shows a field-mapping screen so you can match your file's columns to the matching ConnectMachine fields, keeping everything organized correctly.
07 · Events
How do I group contacts by event?
Met several people at the same place? ConnectMachine helps you keep them together. When you scan more than two contacts in the same location, an event sheet automatically appears so you can group them.
1Scan contacts as usual. After more than two scans in the same location, the event sheet is triggered automatically.
2Add an event (for example, a conference, meetup, or dinner).
3The contacts you scanned are grouped under that event.
4Later, you can quickly find everyone you met at that place by opening the event.
i
Never forget where you met
Grouping contacts by event makes it easy to recall the people you connected with at busy gatherings.
09 · Contacts
What is the Contacts screen?
Once contacts are in your network, the contact details screen gives you several ways to stay in touch.
What is NetSend private messaging?
Send text messages to other ConnectMachine users through ConnectMachine NetSend.
1Open a contact's details. If a chat icon appears, that contact is on ConnectMachine and available for NetSend.
2Tap the chat icon and send your message.
3The recipient sees your message on a silent screen. As soon as they read it and exit the chat, the message is automatically deleted.
i
Private by design
NetSend messages disappear once read, leaving no trace in the chat, ideal for quick, confidential notes.
How do I share a contact with someone?
Share any contact as a vCard (VCF) file.
1Open the contact's details and tap the ⋮ (triple-dot) menu.
2Choose Share Contact. This opens your phone's native share screen.
3Send the vCard through any app or channel available on your device.
How do I set a follow-up reminder by text or email?
Reach out to a contact directly from their details screen.
1Open the contact's details and tap the ⋮ (triple-dot) menu.
2Choose to follow up by text or email. ConnectMachine shows a ready-made template message.
3Edit the template as needed and send. Available only when the contact has a mobile number or email saved.
Ask Concierge inside the contacts
Launch ConnectMachine's AI assistant in one tap, with ready-made templates to get you started fast.
Schedule Meeting, set up a meeting with a contact
Intro, draft an introduction
Share Contact, share a contact's details
Ask Anything, start an open-ended request
i
Skip the blank page
Templates give the AI a head start, so you get useful results without typing everything from scratch.
Transcribe Meetings
Capture your meetings as transcribed notes, linked directly to the right contact. Each contact's details screen includes a Transcribe button.
1Open the contact's details and tap Transcribe.
2If no recording is attached yet, ConnectMachine starts a new recording and links it to this contact.
3If a recording is already attached, tapping the button opens it instead.
4Either way, you're taken to the Notes screen, where the recording and its transcript live.
i
Tied to the right person
Recordings are aligned with the contact, so your meeting notes are always easy to find against the people you met.
08 · Note
How do I add a voice note to a contact?
Sometimes a quick voice memo is the easiest way to remember a conversation. While saving a contact, you can attach a voice note to help you recall who they are and what you discussed.
1While saving a contact, tap Add Voice Note.
2Record your note, anything that helps you remember the person or the conversation.
3Save. The voice note is attached to the contact and available whenever you open it.
i
Jog your memory
A short voice note captures details that are easy to forget, so you can pick up right where you left off next time.
How do I search and filter contacts?
Find anyone in your network fast, whether you remember their name, their company, or just where you met them.
How do I ask AI or search my contacts?
At the top of the Contacts screen, you'll find the Ask AI or Search bar.
Tap the bar to see AI-suggested templates. Selecting one takes you to the Ask screen with that template ready to go.
To search, just type. ConnectMachine searches across every field in your contacts, name, title, company, notes, and more, so you can find anyone by any detail.
How do I sort my contact list?
Tap Sort to order your contact list by:
Alphabetical, A to Z by name
Recently Added, newest contacts first
Recently Modified, most recently updated first
How do I filter contacts by industry or location?
Tap Filter to narrow your list by:
Industry
Location
i
Find anyone, any way
Combine search, sort, and filters to zero in on the exact contact you need.
How does duplicate detection work?
ConnectMachine automatically keeps your list free of duplicates. It checks for duplicate contacts and re-checks every 24 hours, so new duplicates are caught over time.
1When possible duplicates are found, a suggestion appears at the top of your contact list.
2Open it to see the suggested duplicate contacts.
3Merge them, all in one tap, or one by one.
4Ignore them, all at once, or one by one.
i
A cleaner list, automatically
Regular duplicate checks mean your contacts stay tidy without any manual effort.
11 · Contact management
How do I manage my network?
Networks let you organize your contacts into separate groups, and each network has its own card. Here's how to view, reorder, and manage them.
How do I open my networks?
Open your networks in either of these ways, both take you to the same place:
Tap the ‹ Contacts button at the top of the contacts screen, or
Press and hold a network label.
Two options appear: Reorder Networks, rearrange your network labels into the order you prefer; Manage Networks, opens the network list, where each network shows how many contacts it holds.
What can I do in the network list?
Add a new network, tap the Add button.
Press and hold a network, see Rename, Export Contacts (shown only if that network has contacts), and Delete Network.
Swipe right on a network, quick access to Export Contacts (if that network has contacts).
Swipe left on a network, quick access to Delete and Rename.
How do I export contacts from a network?
When you export a network's contacts, all contacts in that network are emailed to the email address on your account.
How do I move a contact to a different network?
Single contact (swipe), swipe right on a contact and tap Change Network.
Single contact (from details), open the contact and update its network from inside.
Bulk update, press and hold a network, select multiple contacts, and update them all in one tap.
!
Important: networks and cards are linked
Each network is tied to its own card. When you create a network, a new card is automatically created using your default details. When you delete a network, the card associated with it is also deleted.
10 · Contacts
How do I export all my contacts as CSV?
Export all contacts from ConnectMachine as a CSV file. The file is sent to the email address registered on your account, so you can open it on your phone, computer, or import it into another app.
1In the bottom menu bar, tap the three dots icon.
2Go to Settings from the menu.
3Tap Export contacts to start the export.
4Check your registered email for the CSV file once the export is ready.
CSV format: The file includes your contact details in a standard format you can open in spreadsheets or CRM tools.
Registered email only: ConnectMachine sends the export to the email address linked to your account for security.
Full network export: All contacts saved in ConnectMachine are included in the file.
12 · AI features
What is AI Concierge?
Your private AI agent that understands your network. Ask questions in plain language, recall who you met and where, and trigger actions like scheduling or sharing without digging through your contact list manually.
How do I get started with AI Concierge?
Open Ask Concierge and start with a ready-made template or just type your request in plain language:
Schedule Meeting, set up a meeting with a contact
Intro, draft an introduction
Share Contact, share a contact's details
Ask Anything, start an open-ended request
How does AI Concierge handle meetings and calendar?
Connect your calendar account first. Google Calendar and Outlook are currently supported. Once connected, AI Concierge can:
Book a meeting
Show your scheduled meetings
Update a meeting
Accept or decline a meeting, and respond to RSVPs
How do I draft introductions with AI Concierge?
Introduce any two people. AI Concierge drafts an intro email that you can edit and send.
How does AI Concierge manage contacts, cards, and networks?
Create a new contact, and update an existing one
Create a card or network, and update them
Share a contact with someone
How do I set reminders with AI Concierge?
Set a reminder for any date and time, with a specific title.
On iOS, the reminder is added to the Reminders app; on Android, it's added to Google Calendar.
How do I explore my network with AI Concierge?
Search for contacts by industry, role, location, skill, notes, and more
Break down your contacts by industry
Find people by where you met them, for example, a specific event
Ask about any contact in plain language
i
Do more in one go
AI Concierge can handle multiple tasks in a single prompt, for example, "schedule a meeting with Priya and intro her to Sam."
i
Keeps working in the background
After you send a prompt, AI Concierge keeps working even if the app moves to the background.
13 · AI features
What is AI Notetaker?
Record your meetings and let ConnectMachine do the writing. When you stop recording, AI Notetaker processes the audio and gives you a clean summary and full transcript, ready to share.
How do I record and process a meeting?
1Start a recording when your meeting begins.
2When you're done, stop the recording.
3AI Notetaker processes the audio and generates a summary and a transcript.
How do I share notes from AI Notetaker?
Once processing is complete, you can:
Copy the summary or transcript and send it to anyone, or
Share a link directly to the notes.
How does speaker identification work in AI Notetaker?
In the transcript, you can select or deselect speakers.
When you select a speaker who is already in your network, AI Notetaker links them to that contact, keeping your meeting notes connected to the right people.
01 · Introduction
What are admin branding controls?
Admin Branding Controls let team admins apply a consistent look across every member's digital card. Instead of default ConnectMachine styling, cards show your company logo, banner, and brand colors on the card itself and on shared card links.
i
Admin access required
Only team admins can manage branding settings. Changes apply to team members automatically.
What can team admins customize?
Branding controls cover the visual identity that appears on cards and shared profile pages.
Setting
What it does
Company logo
Displays your logo on the card shelf and shared links, replacing default branding.
Banner / cover image
Adds a header image across cards for a polished, fully branded look.
Brand colors
Apply your primary brand color to buttons, accents, and card highlights. (Team members can customize theme colors on their own cards)
How do I set up team branding?
Configure branding once from the admin dashboard. Updates roll out to the whole team.
1Open team admin settings in ConnectMachine.
2Go to Branding Controls under your team workspace.
3Upload your company logo and banner or cover image.
4Set brand colors and add company details.
5Save and preview a member card to confirm the look.
What are tips for team branding?
Logo: Use a high-resolution PNG, JPG, GIF, WEBP, or SVG without background or transparent background.
Cover image (Banner): Choose a wide image that crops well on mobile and desktop. (16:9 ratio recommended)
Consistency: Apply branding at the team level so new members inherit it automatically.
Modification: Team members can customize theme colors, cover image, profile picture and logo on their own cards
01 · Introduction
What is custom domain configuration?
Custom Domain Configuration lets you host your public profile and shared card links on a domain you own, such as card.yourcompany.com. Visitors see your brand in the URL bar, not a default ConnectMachine link.
i
Team and individual plans
Custom domains are available on supported plans. Check your workspace settings to confirm access.
What do I get with a custom domain?
A custom domain keeps your card links professional and fully on-brand.
Feature
What it does
Your own URL
Share cards from a domain you control instead of a generic ConnectMachine link.
Full DNS support
Connect using standard DNS records from your domain registrar or DNS provider.
Automatic SSL
HTTPS certificates are provisioned automatically once DNS is verified.
Guided setup
In-app steps show exactly which records to add and when your domain is ready.
How do I set up a custom domain?
Most setups complete in minutes once DNS records are added.
1Open domain settings in ConnectMachine.
2Enter your domain, for example card.yourcompany.com.
3Copy the DNS records shown in the setup flow.
4Add the records at your DNS provider or registrar.
5Verify and go live once ConnectMachine confirms the domain and SSL are active.
How do I share my custom domain card?
After setting up your custom domain in ConnectMachine, your card has its own share-ready link. A common mistake is sharing the base domain URL (for example, https://connect.yourdomain.com) on its own. The base URL alone does not include the unique card token, so it won't load any card and will show an "invalid share link" error.
ConnectMachine provides the exact record values during setup. Most configurations use a CNAME or A record pointing to our servers.
Type
Name / Host
Value
CNAME
Your subdomain
Target hostname provided in ConnectMachine (recommended for subdomains).
!
Use the in-app values
Always copy record names and values from your ConnectMachine domain setup screen. Do not guess hostnames or IPs.
What are tips for custom domains?
Subdomains: Use a subdomain like card. or me. if your root domain hosts a website elsewhere.
Propagation: DNS changes can take up to 48 hours, though many providers update within minutes.
SSL: Wait for verification to finish before sharing the new URL publicly.
Team rollout: Once verified, shared card links automatically use your custom domain.
01 · Introduction
What is webhook integration?
Subscribe to contact events and ConnectMachine sends a JSON POST to your HTTPS endpoint whenever one fires. Deliveries are asynchronous and retried on transient failures.
!
HTTPS required
Receiver URLs must be HTTPS and publicly reachable, localhost and private hosts are rejected.
What webhook events are supported?
Three event types cover the full contact lifecycle.
Event
When it fires
contacts.created
A contact is created manually or imported.
contacts.updated
A contact is updated, tagged, or linked with notetaker / session data.
contacts.deleted
One or more contacts are deleted.
How do I create a webhook?
1Open webhook settings in ConnectMachine.
2Add your HTTPS endpoint as the destination URL.
3Choose events to subscribe to.
4Save, then send a test event from the in-app tester.
5Check delivery logs for status and timings.
How do I send a test webhook event?
Fire a sample contacts.* delivery from the webhook settings to verify your endpoint accepts the payload and returns 2xx. Your URL must be HTTPS, publicly reachable, and respond within 10 seconds.
i
CORS note
If the browser blocks the call with a CORS error, send the same request from your server or curl instead.
How does webhook delivery work?
Every delivery is a JSON POST with the headers below. Transient failures are retried; logs show the result.
Stable identifier for this delivery. Use it for idempotency.
occurred_at
string (ISO 8601)
UTC timestamp of when the change happened in ConnectMachine.
source
string · optional
Present when the trigger is known, for example contact_import or test. Omitted for ordinary manual create/update/delete.
source_id
string · optional
Identifier of the originating import or API call, when applicable.
batch
object · optional
Present for chunked deliveries: index, count, max_size.
data
object
Event payload. Contains event_type (one of contacts.created, contacts.updated, contacts.deleted) and either contacts (for created/updated) or contact_ids (for deleted).
A complete sample contacts.created delivery, with the contact field reference alongside.
What are webhook best practices and troubleshooting tips?
Return 2xx quickly: acknowledge first, queue slow work for the background.
Be idempotent: events can be redelivered; key off X-ConnectMachine-Delivery-ID.
Tolerate missing optional fields: not every contact has every field.
Log event_type and delivery_id for traceability.
Keep responses small: bodies are truncated to 4096 bytes in logs.
Problem
What to check
No events received
Webhook is active, the event is subscribed, and the URL is a public HTTPS endpoint.
Delivery failed with 4xx
Check route, auth, body parser, and response code.
Delivery retries
Receiver timed out or returned 408 / 425 / 429 / 5xx.
No delivery log yet
Delivery is still pending, pending attempts aren't listed.
Deleted event has no contacts
Deleted events send contact_ids only.
08 · Example
How do I integrate ConnectMachine with Zapier?
Automate contact workflows in Zapier and send ConnectMachine events to Salesforce, HubSpot, Zoho, Pipedrive, or any other Zapier-supported CRM.
What this guide helps you build
A Zapier automation where ConnectMachine sends contact events to a Zapier webhook, Zapier reads the event payload, and your selected CRM creates, updates, or processes the contact automatically.
Before you start
A ConnectMachine subscribed account with Webhook Integration available.
A Zapier account.
Access to the CRM you want to update, such as Salesforce, HubSpot, Zoho, or Pipedrive.
A clear decision about which event should trigger the workflow: contact created, contact updated, or contact deleted.
End-to-end flow
1Create a new Zap in Zapier.
2Choose Webhooks by Zapier as the trigger and select Catch Hook.
3Copy the Zapier webhook URL.
4Paste that URL into ConnectMachine under Settings > Webhook Integration.
5Enable the ConnectMachine event or events you want Zapier to receive.
6Trigger a test event from ConnectMachine and confirm Zapier receives it.
7Optionally add a Zapier Filter so the Zap only continues for one event type.
8Choose your CRM action, map fields from the webhook payload, test the action, and publish the Zap.
Step 1: Open Webhook Integration in ConnectMachine
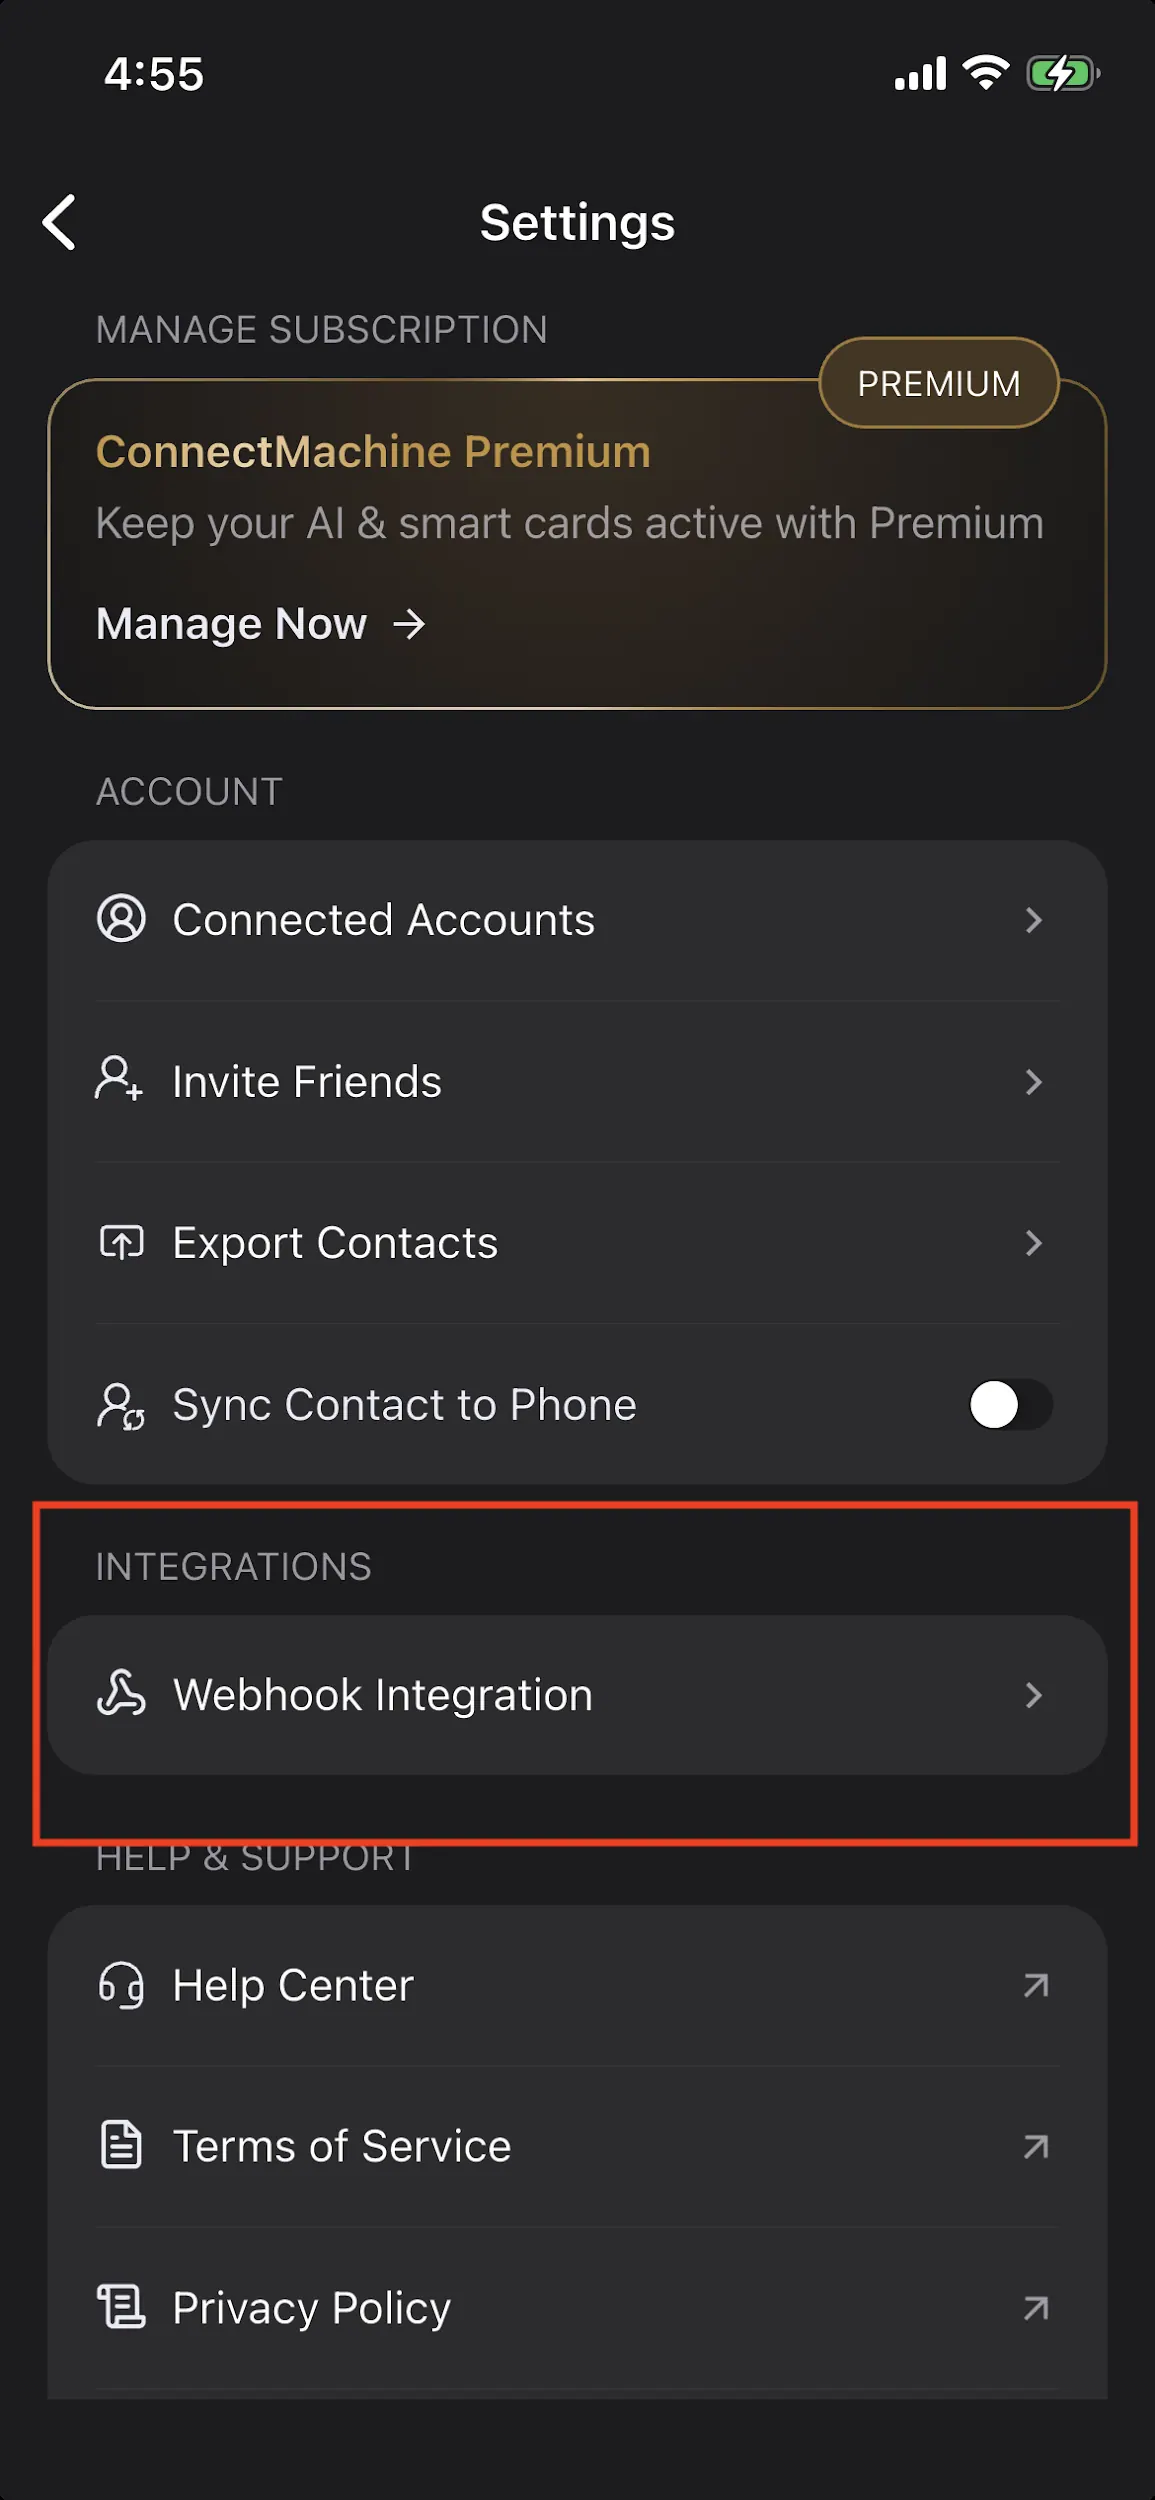
In the ConnectMachine app, open Settings and tap Webhook Integration under Integrations.
ConnectMachine Settings screen: Webhook Integration is under Integrations.
Step 2: Create a Webhook Trigger in Zapier
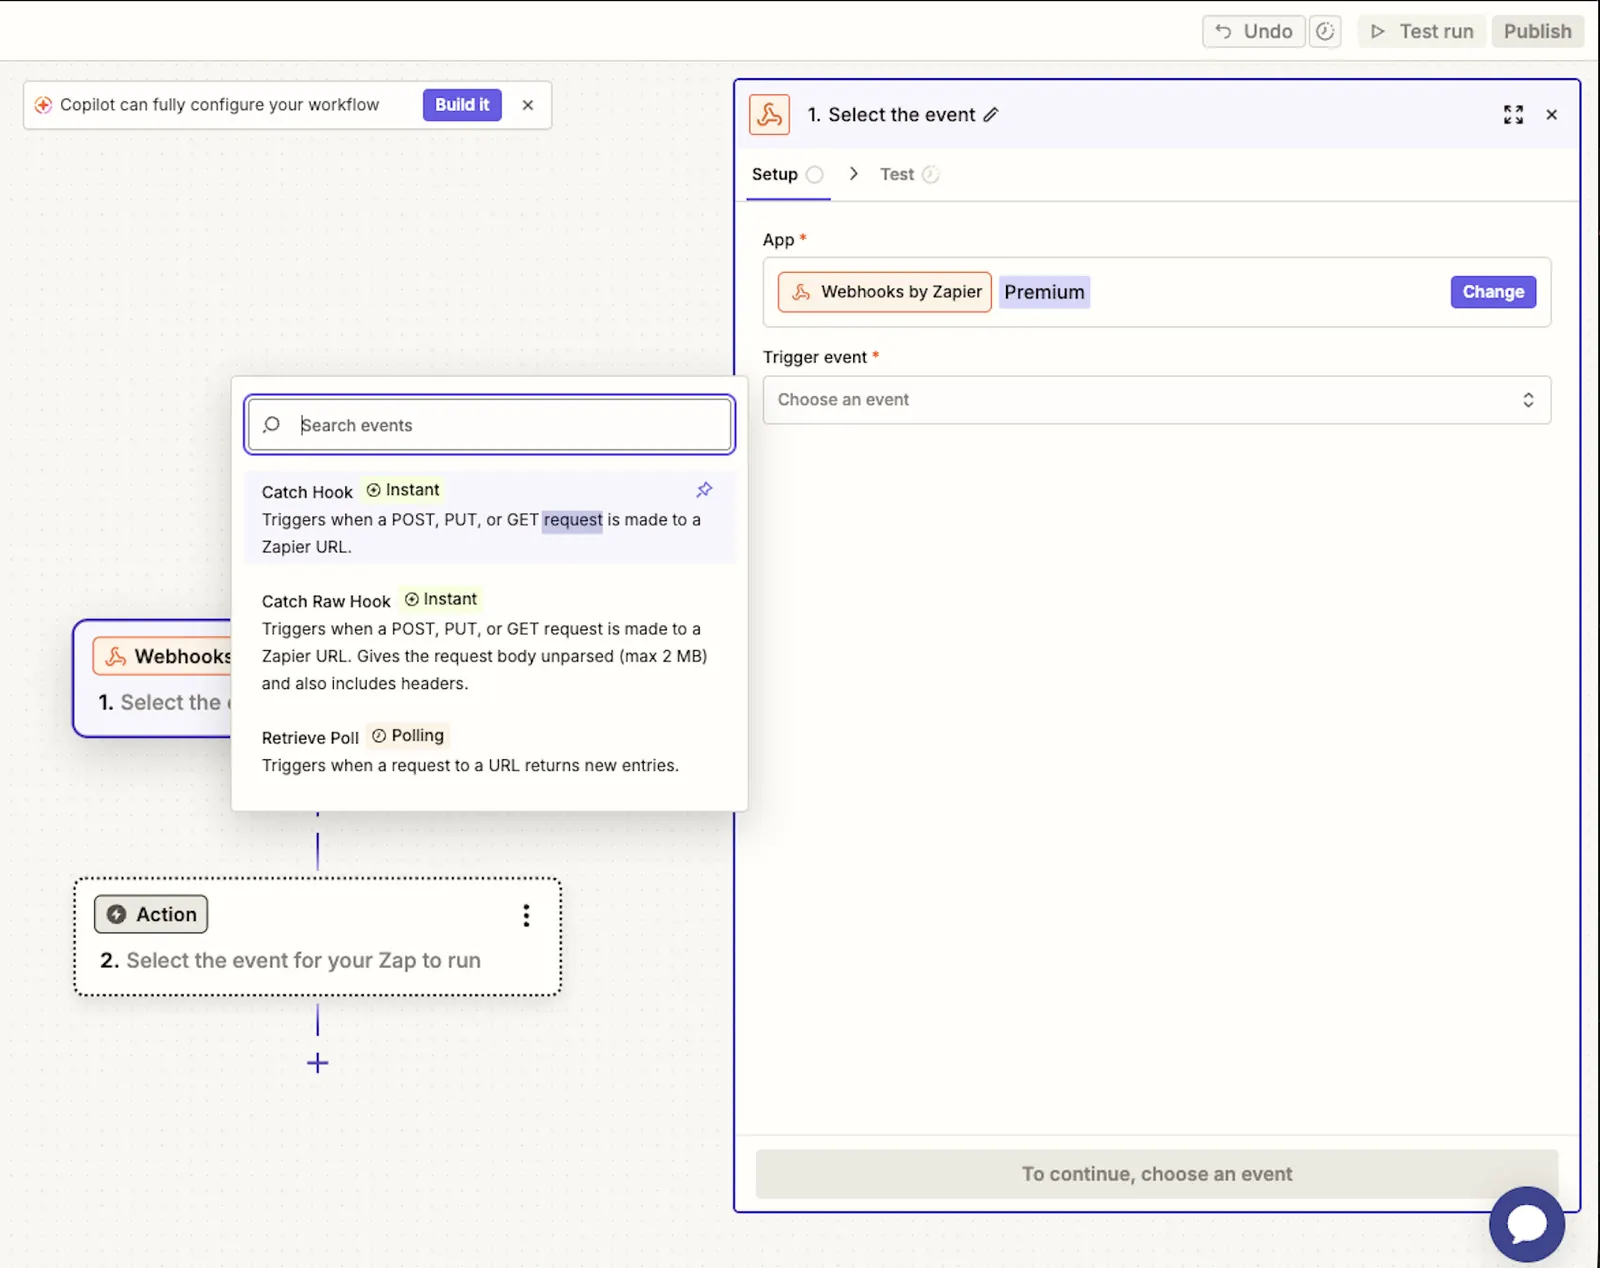
In Zapier, create a new Zap. For the trigger app, choose Webhooks by Zapier. For the trigger event, choose Catch Hook. This gives Zapier a unique URL that can receive events from ConnectMachine.
Zapier trigger setup: choose Webhooks by Zapier and select Catch Hook.
Step 3: Copy the Zapier Webhook URL
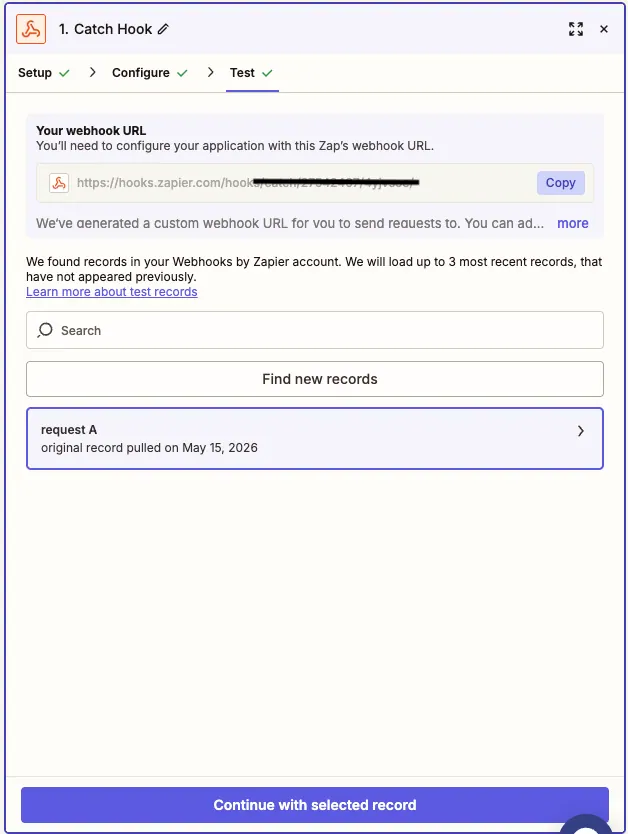
After the Catch Hook trigger is configured, Zapier shows a webhook URL. Copy this URL. Treat it like a private endpoint because anyone with the URL can send data to the Zap.
Zapier Catch Hook screen: copy the generated webhook URL.
Step 4: Add the Endpoint URL in ConnectMachine
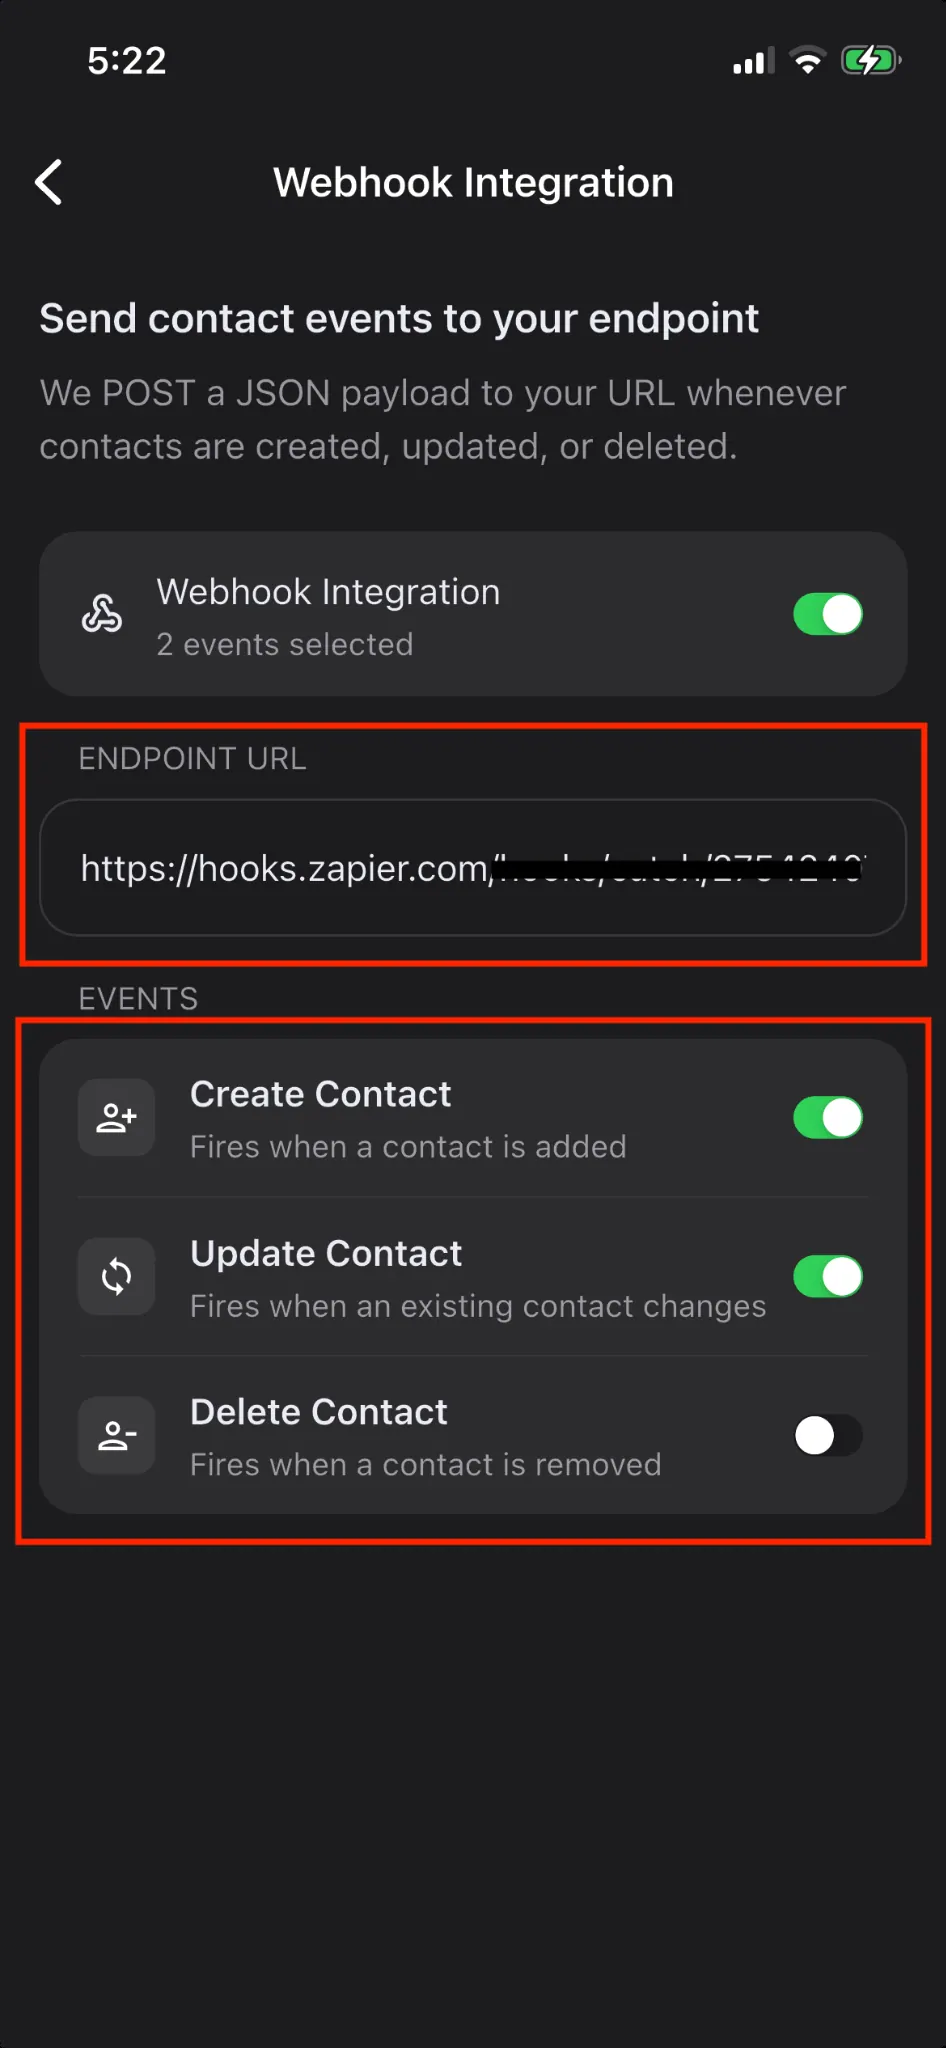
Paste the Zapier webhook URL into the Endpoint URL field in ConnectMachine. Turn on Webhook Integration, then enable the events you want to send.
Create Contact sends contacts.created when a contact is added.
Update Contact sends contacts.updated when a contact changes.
Delete Contact sends contacts.deleted when a contact is removed.
ConnectMachine Webhook Integration screen: endpoint URL and selected events.
Step 5: Send a Test Event to Zapier
After the URL is saved and an event is enabled, create, update, or delete a contact in ConnectMachine to generate a webhook event. Return to Zapier and use Test trigger or Find new records. Select the request Zapier found, then continue.
Zapier found a request from ConnectMachine and can use it as the sample record.
Step 6: Set the Child Key to data
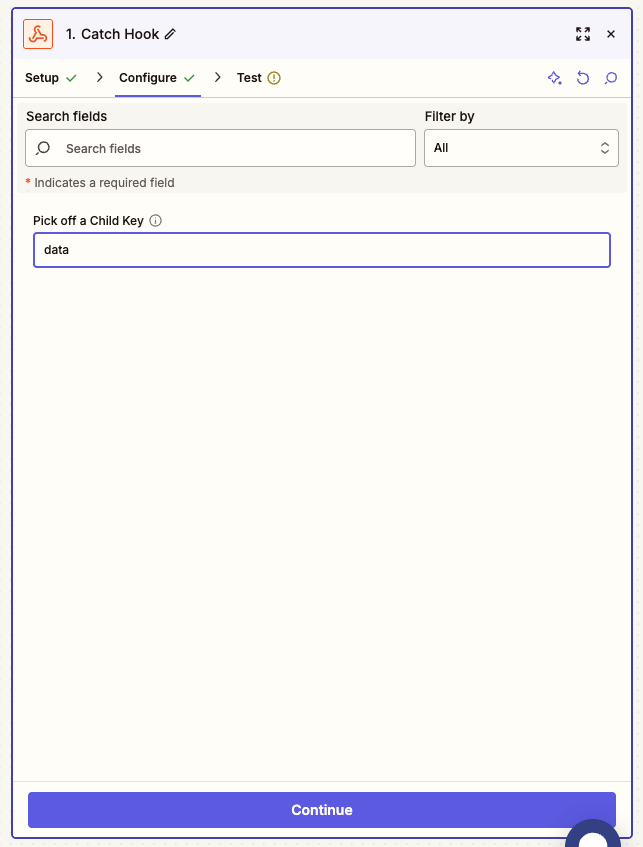
In the Catch Hook configuration, set Pick off a Child Key to data. This tells Zapier to use the main event body, where ConnectMachine sends event_type, contacts, and contact_ids.
Zapier Catch Hook configuration: set the child key to data.
i
Why the child key matters
ConnectMachine sends delivery metadata at the top level and workflow data inside data. Using data as the child key makes Zapier field mapping cleaner. For create/update events, use Contacts [0] fields for normal single-contact events. For import batches, use Zapier looping or line-item handling if you want to process every contact in the batch.
Step 7: Filter by Event Type
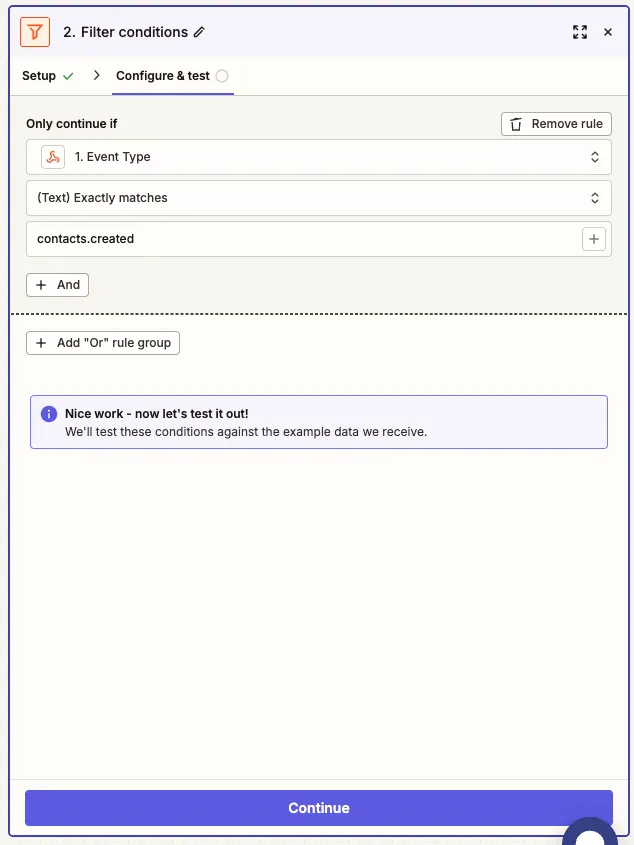
If the same Zapier hook receives multiple event types, add Filter by Zapier before your CRM action. Configure the filter so Event Type exactly matches the event this Zap should handle.
For a create workflow, filter Event Type exactly matches contacts.created.
For an update workflow, filter Event Type exactly matches contacts.updated.
For a delete workflow, filter Event Type exactly matches contacts.deleted.
Zapier filter: only continue when Event Type matches contacts.created.
Step 8: Choose Your CRM Action
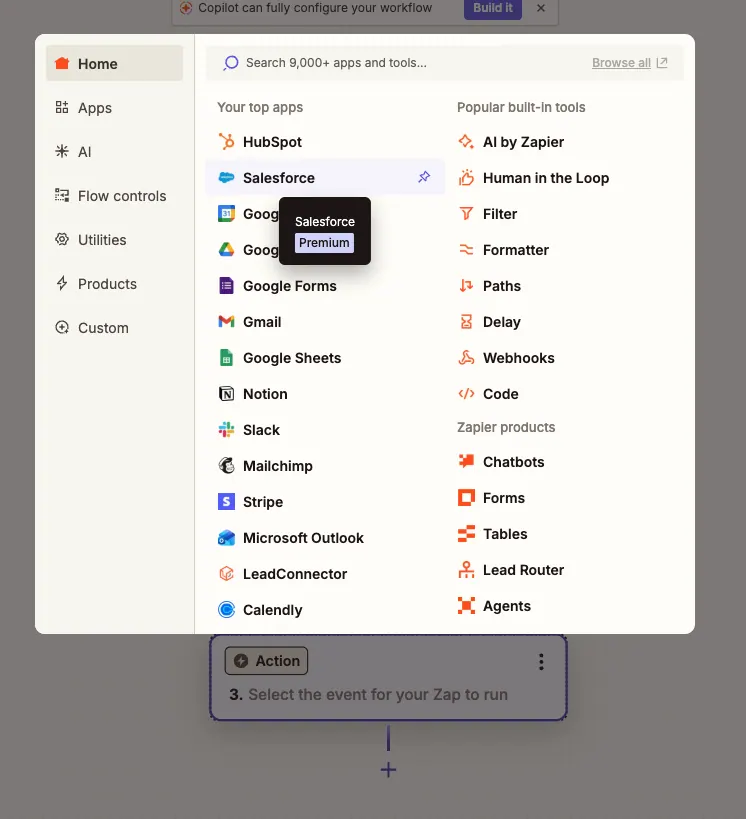
Add the CRM you want to update as the next Zap step. The screenshots use Salesforce as an example, but the same pattern works for any Zapier-supported CRM.
Zapier action picker: select the CRM app you want to update.
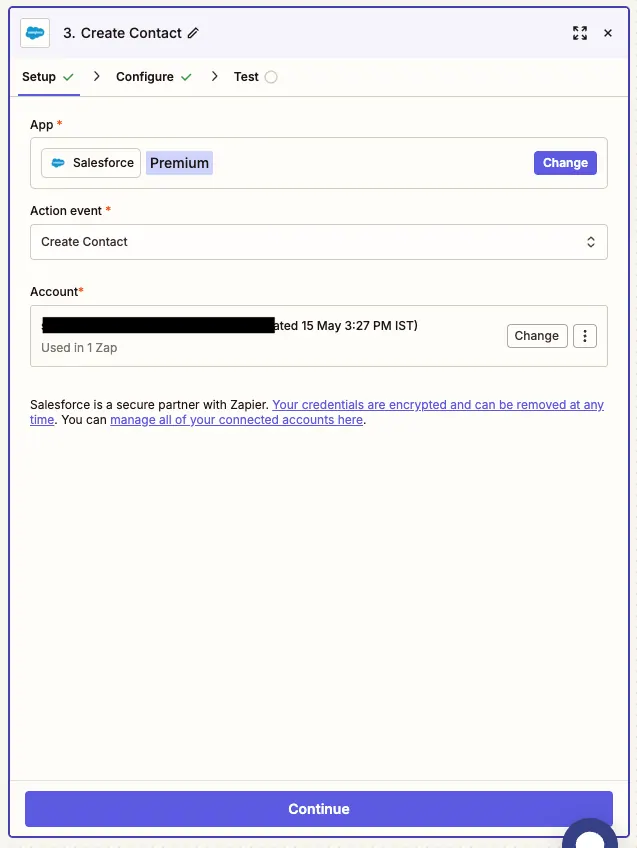
Choose the CRM action that matches your workflow. For example, choose Create Contact for a contacts.created Zap. Connect the CRM account when Zapier asks for authorization.
Salesforce example: choose Create Contact and connect the CRM account.
Step 9: Map ConnectMachine Fields to CRM Fields
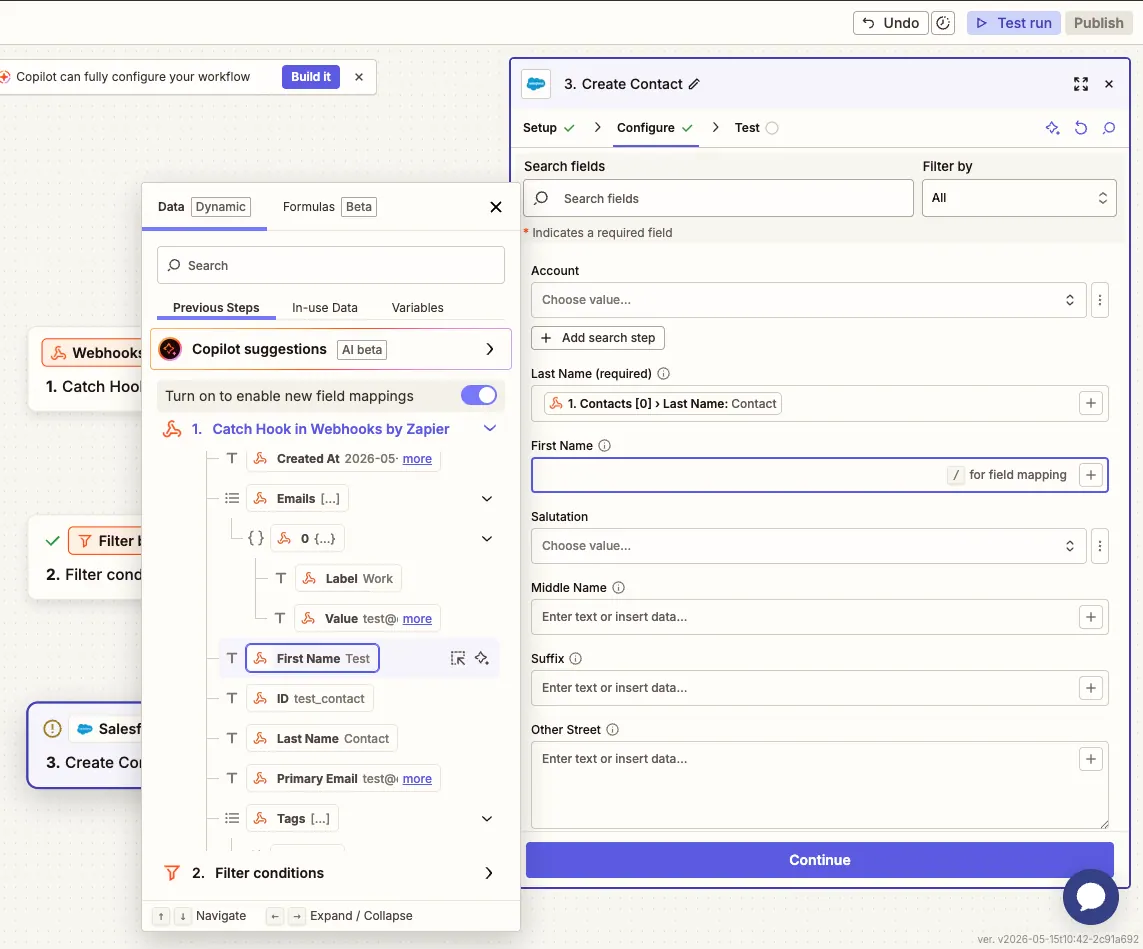
In the CRM action setup, use Zapier's field picker to map values from the webhook payload into the CRM fields. For normal create/update events, contact fields appear under Contacts [0].
Map First Name to Contacts [0] > First Name.
Map Last Name to Contacts [0] > Last Name.
Map Email to Contacts [0] > Primary Email, or to Contacts [0] > Emails [0] > Value.
Map Phone to Contacts [0] > Primary Phone, or to Contacts [0] > Phones [0] > Value.
Map social URLs directly by key, such as linkedin_url or github_url.
Zapier field mapping: map ConnectMachine payload values into CRM contact fields.
Step 10: Test and Publish
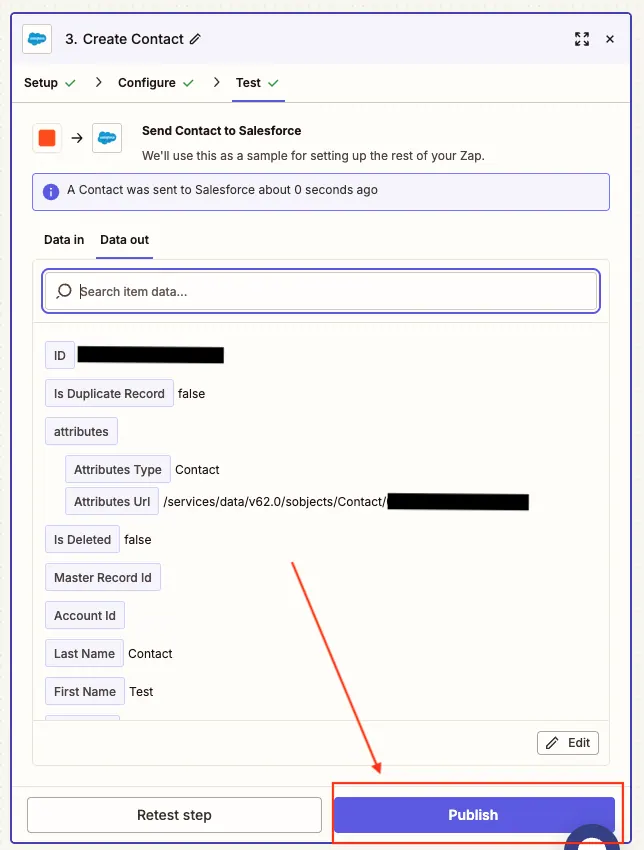
Use Zapier's Test step to send the sample contact to your CRM. Confirm the CRM record is correct, then publish the Zap.
Zapier test result: the CRM accepted the mapped contact data.
Monitor Delivery in ConnectMachine
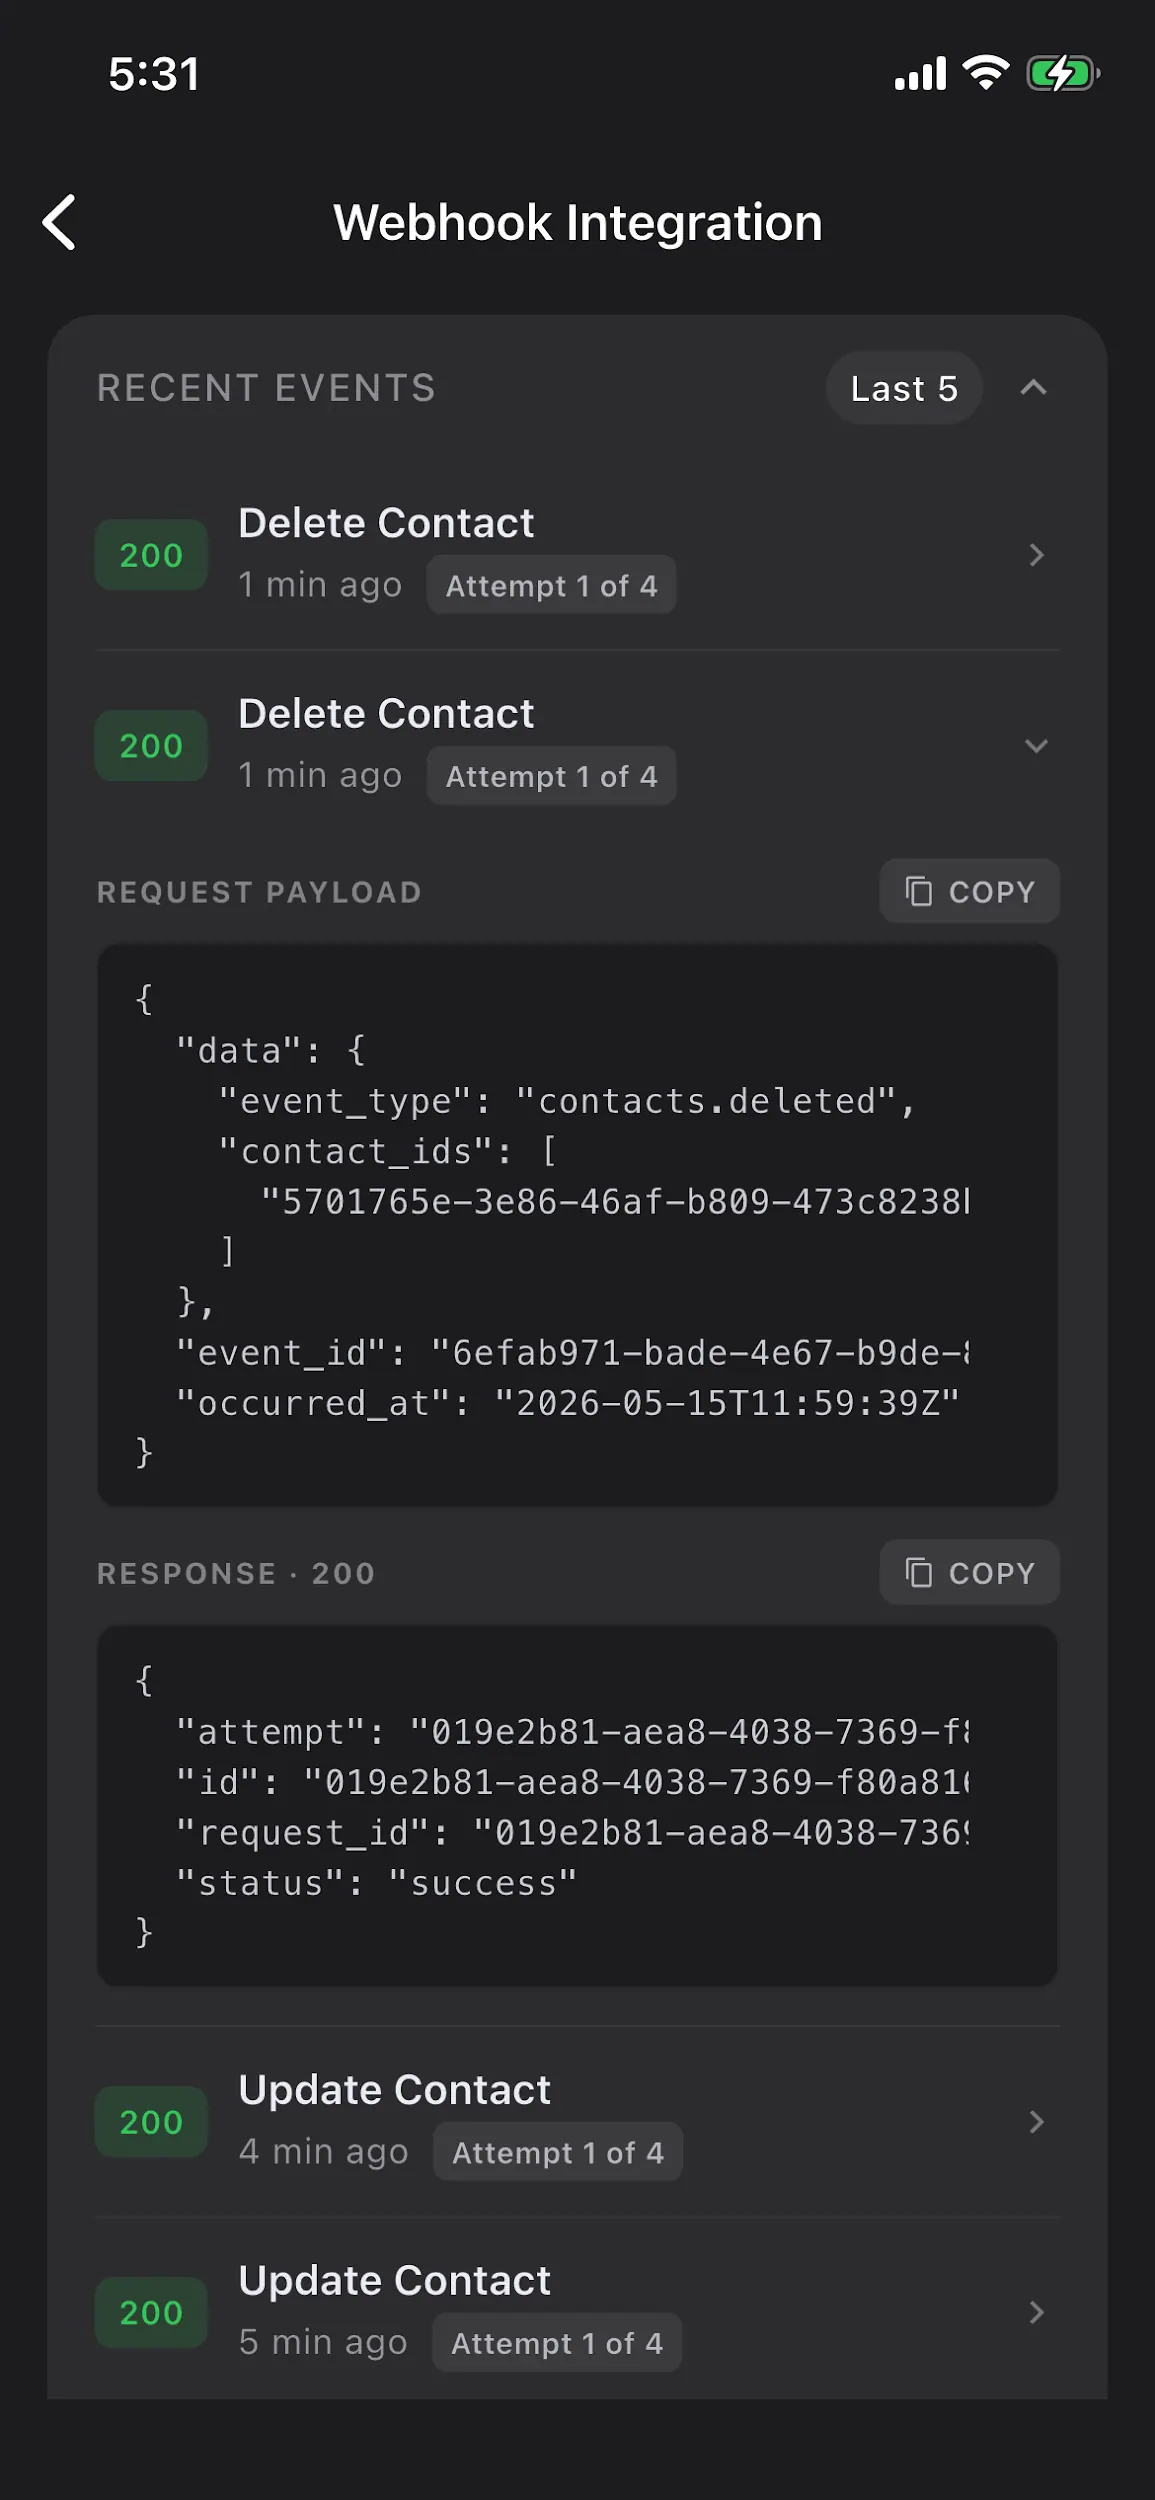
ConnectMachine shows recent webhook deliveries with status codes, attempt counts, request payloads, and response bodies. A 200 response means Zapier accepted the event. Failed deliveries should be inspected from the response body and retried after the endpoint issue is fixed.
ConnectMachine recent events: inspect request and response payloads for debugging.
Payload reference
ConnectMachine sends JSON to the Zapier URL. The event name is inside data.event_type. Create and update events include data.contacts. Delete events include data.contact_ids.
Archive, tag, or mark deleted if the CRM supports it
Process imported batches
event_type = contacts.created
Use Looping by Zapier or line-item handling to process every contact
Troubleshooting
Zapier does not find a test record: make sure the ConnectMachine endpoint URL exactly matches the Zapier hook URL, the integration is turned on, and at least one event is enabled. Then create, update, or delete a contact again.
Fields are hard to map in Zapier: set the Catch Hook child key to data and retest the trigger.
The wrong event reaches the CRM action: add a Filter by Zapier step and match event_type exactly.
Only one imported contact appears in the CRM: import events can contain multiple contacts; use Looping by Zapier or a CRM bulk action if you want every contact processed.
Zapier receives the event but the CRM action fails: check the CRM action's test result and the ConnectMachine Recent Events response body.
Social URLs are hard to map: use the platform-specific key, such as linkedin_url, github_url, twitter_url, facebook_url, youtube_url, or instagram_url.
Security and maintenance
Keep the Zapier webhook URL private.
Use only HTTPS webhook URLs.
Disable events in ConnectMachine if a Zap should stop receiving them.
If you replace the Zapier hook URL, update the Endpoint URL in ConnectMachine.
Review Recent Events after publishing to confirm production events are reaching Zapier successfully.
Verify in your integrated CRM or workflow that the data appears correctly.
09 · Developers
How do I connect ConnectMachine to Claude, Cursor, or another AI tool with MCP?
ConnectMachine runs a remote MCP server, so any tool that speaks the Model Context Protocol can read and update your contacts, events, networks, and digital cards through ordinary conversation. There is nothing to install: your tool connects over HTTPS with your personal key.
What this guide helps you build
A working connection between your AI tool and your ConnectMachine account, so you can ask it to find a contact, add the event where you met someone, or update a digital card without leaving the tool you already work in.
Before you start
A ConnectMachine account.
An AI tool that supports remote MCP servers, such as Claude, Claude Code, Cursor, VS Code, Zed, Windsurf, or Cody.
Your personal MCP key, which you get from the connect page in the next step.
End-to-end flow
1Open the MCP connect page and sign in with your ConnectMachine account email or Google.
2Copy your MCP key.
3Paste the configuration for your tool and replace YOUR_MCP_KEY with your key.
4Restart the tool and confirm ConnectMachine appears in its list of MCP servers.
5Ask your assistant a question about your network to confirm the connection works.
Step 1: Get your MCP key
Your key is a personal bearer token tied to your ConnectMachine account. Open licenses.connectmachine.ai/mcp/auth and sign in with your account email (one-time code) or Google. The page shows your key along with ready-made snippets for popular tools. Keep the key secret: anything holding it can act on your account.
Step 2: Connect Claude
For Claude on the web and desktop, open Settings, then Connectors, choose Add custom connector, and paste the server URL https://mcp.connectmachine.ai/mcp. No file is needed: Claude runs the sign-in flow for you. For Claude Code, create .mcp.json in your project root with the snippet below and restart Claude Code.
Cursor reads MCP servers from ~/.cursor/mcp.json for every project, or from .cursor/mcp.json inside a single project. Add the snippet below, then open Settings and confirm ConnectMachine is listed and enabled.
VS Code uses a servers object rather than mcpServers, and each entry declares its transport type. Put the snippet below in .vscode/mcp.json, then start the server from the Copilot Chat MCP panel.
Zed calls MCP servers context servers and supports remote ones directly in settings.json. With no Authorization header, Zed runs the standard MCP sign-in flow the first time it connects, so the URL alone is enough.
The server publishes 40 focused tools covering contacts, events, networks, digital cards, import and export, and your profile. Your assistant picks the right one for each request, so you never name a tool yourself.
Find the contacts I met at Web Summit last year.
List the founders in my network who work in fintech.
Add a phone number to Priya and tag her with the event where we met.
Update the job title on my sales digital card.
!
Tip
To disconnect, remove the ConnectMachine entry from your tool config. Your key stays valid for any other tool still using it, so rotate it from the connect page if you think it has leaked.
The full MCP reference, including every tool area and the Premium rules that apply, lives in the MCP server guide.
10 · Developers
How does the native Zapier integration work?
Build instant, two-way contact workflows without copying webhook URLs. Connect once, choose a trigger or action, map the fields, and publish your Zap.
!
Availability
Available to active paid subscribers, organization license members, and active Premium trials.
End-to-end flow
1Choose ConnectMachine in Zapier and sign in once with Google or an email verification code.
2Approve the permissions the consent page lists.
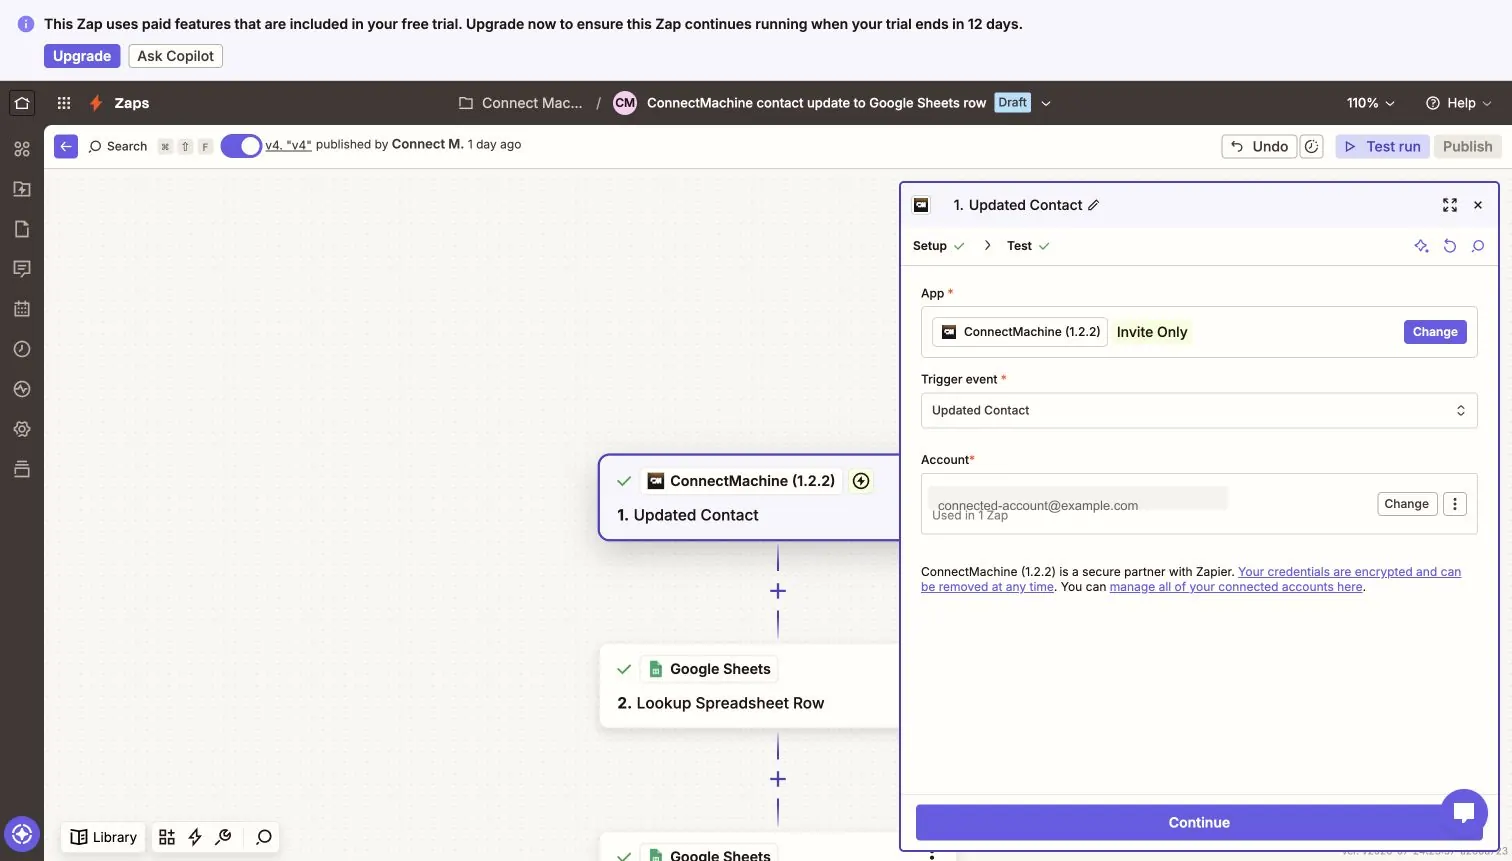
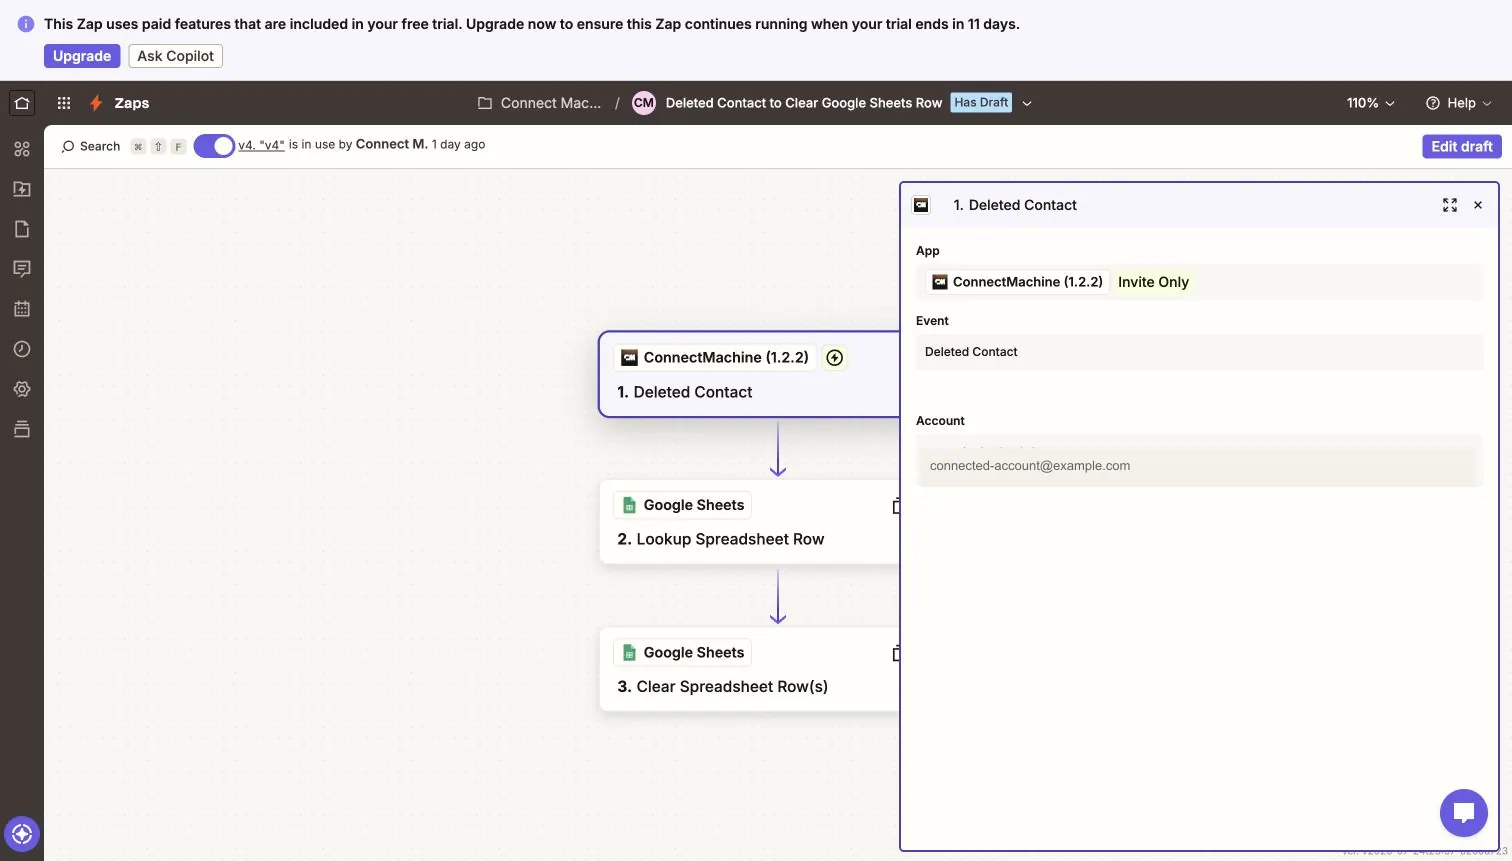
3Pick a trigger (New, Updated, or Deleted Contact) or an action (Create or Update Contact).
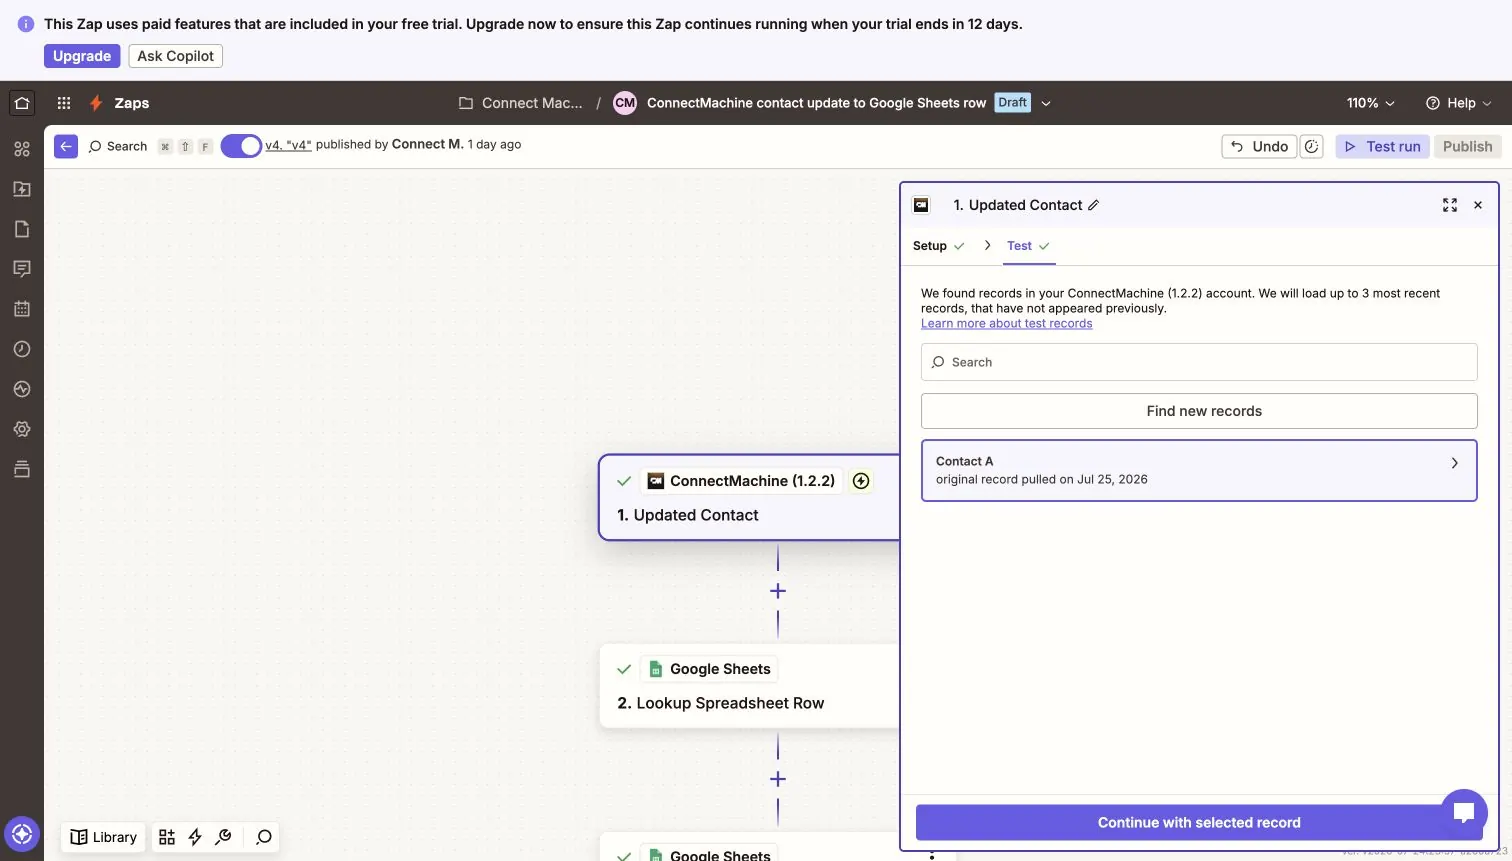
4Test the step so Zapier pulls a real sample and you can see the payload fields.
5Map the fields you need, then publish the Zap.
Triggers and actions
The integration contains five visible operations.
New Contact trigger — runs for contacts.created.
Updated Contact trigger — runs for contacts.updated.
Deleted Contact trigger — runs for contacts.deleted and includes the contact snapshot captured before deletion.
Create Contact action — creates a person or business contact.
Update Contact action — updates an existing contact selected from a dropdown or mapped as a custom ID.
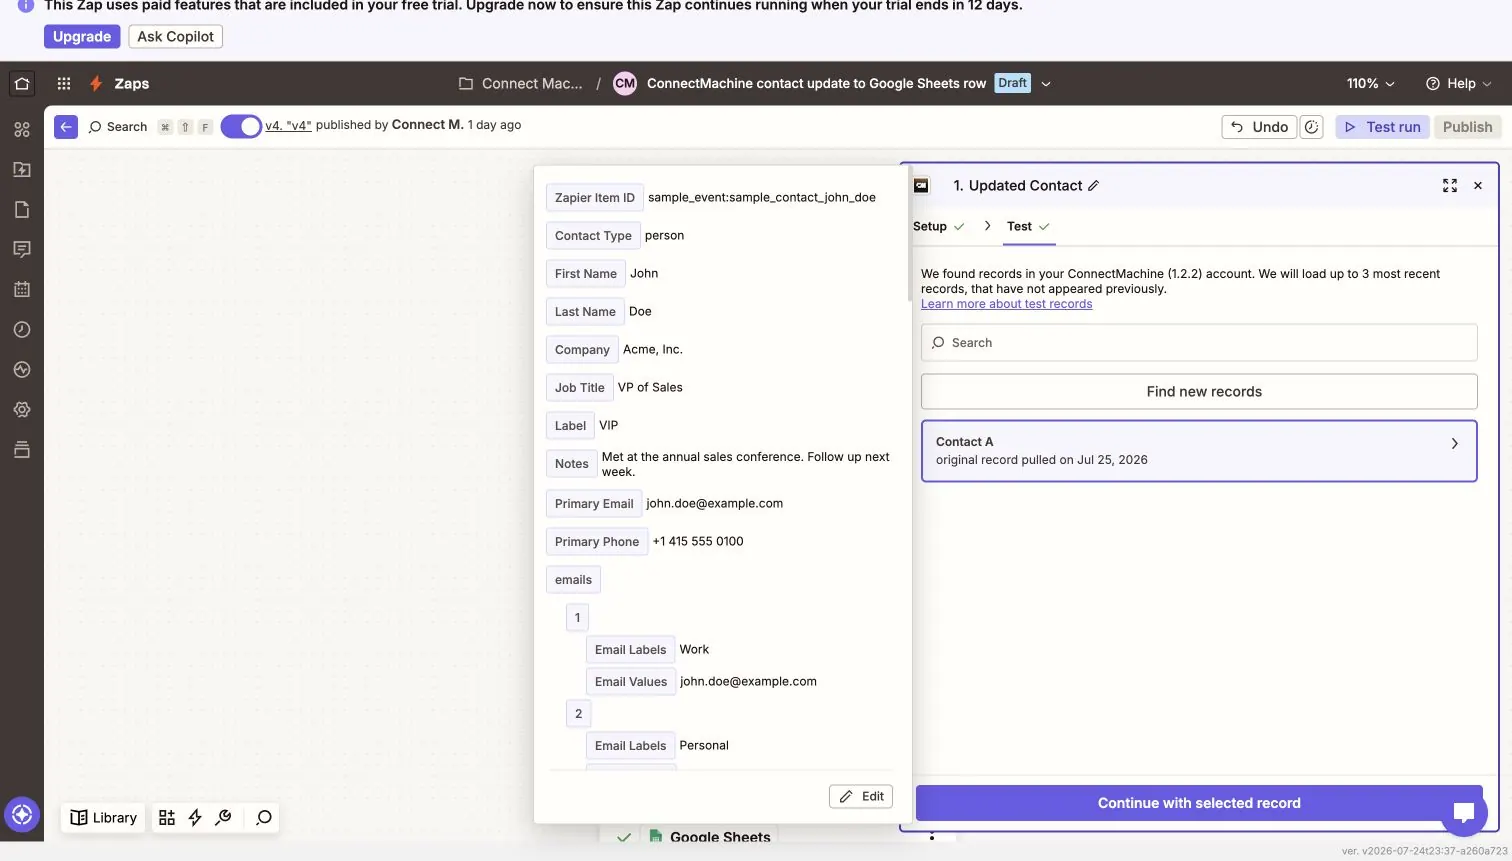
Testing a trigger pulls a real sample contact from your account.
The trigger payload: every field here can be mapped into later Zap steps.
!
Note
Deleted Contact is a trigger only. There is no Delete Contact action.
Connect your account
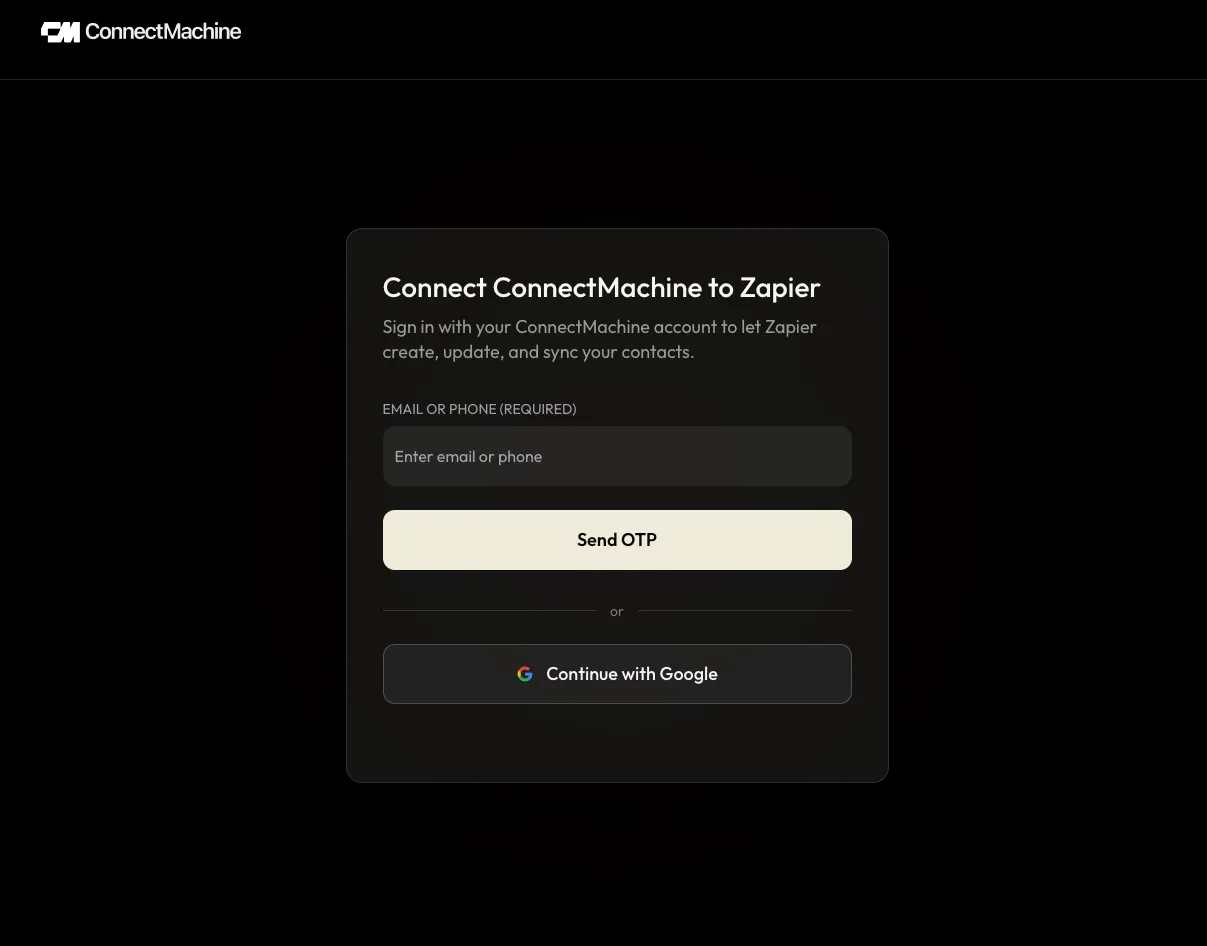
Choose ConnectMachine in Zapier and click Sign in. Approve access using Google or an email verification code. Only an existing, onboarded ConnectMachine account can connect. Reconnect from Zapier if your authorization is revoked or a refresh-token security check closes the connection.
The ConnectMachine consent page. Every permission Zapier asks for is listed before you approve.
Create Contact fields
Choose person or business, then map first name, last name, company, job title, notes, an optional network, primary email, primary phone, and website.
Person contacts require a first name.
Business contacts require a company.
Email and website values are validated.
If Network is omitted, ConnectMachine uses your default network.
The Create Contact action and the fields you can map into it.
Update Contact fields
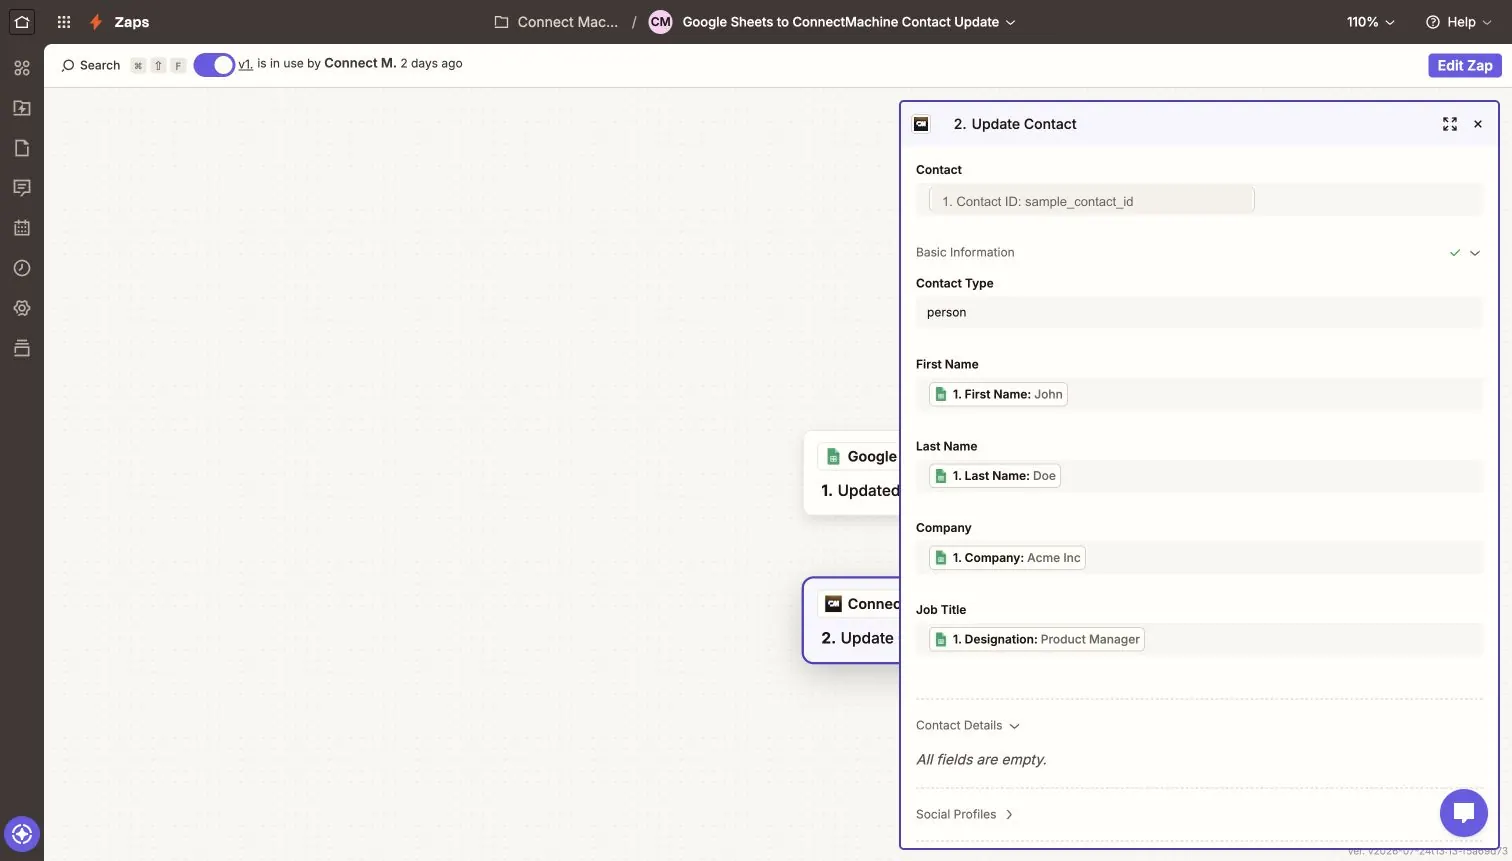
Contact ID is required. Pick a recent contact from the dropdown or choose Custom to map an ID from a previous Zap step. Map only the fields you want to change.
Blank or omitted values do not clear data in v1.
Primary email, phone, and website update the current primary value or create one.
The selected contact and network must belong to the connected account.
Update Contact: pick a recent contact from the dropdown, or map a custom ID.
Prevent recursive Zaps
Changes created by ConnectMachine actions emit the normal New Contact or Updated Contact trigger. Their output contains source=zapier and source_id for the connection grant.
!
Note
Add a Zapier Filter such as "source does not exactly match zapier" when a Zap writes back to ConnectMachine.
Deleted contacts
Deleting one contact, bulk deleting, delete-all, or merging contacts can run the Deleted Contact trigger. Zapier receives one item per deleted contact with deleted_at and its pre-delete fields. The older manual webhook integration remains ID-only for deletion events.
The Deleted Contact trigger returns the contact as it was before deletion.
Privacy and permissions
Zapier stores the OAuth credentials for your connection. ConnectMachine stores only access-token identifiers and hashed refresh tokens. The consent page never stores either token in browser storage.
user:read labels the connection.
contacts:read powers triggers, samples, and dropdowns.
contacts:write permits Create Contact and Update Contact.
webhooks:write lets Zapier manage only its own trigger subscriptions.
Developer reference
OAuth uses authorization code with S256 PKCE and automatic refresh. Native subscriptions use POST /api/v1/zapier/subscriptions and DELETE /api/v1/zapier/subscriptions/:id. Trigger samples use GET /api/v1/zapier/trigger-samples. Actions use POST /api/v1/zapier/contacts and PATCH /api/v1/zapier/contacts/:id.
Troubleshooting
A Premium message means the account no longer has an eligible plan. A permission message means the Zap needs to reconnect and approve the requested scopes. If a trigger stops after Zapier returns 410 Gone, turn the Zap on again so Zapier creates a fresh subscription. For repeated authentication errors, remove the connection in Zapier and reconnect.
14 · Account
How does the ConnectMachine referral program work?
Refer ConnectMachine to friends and connections to earn rewards and extend your own subscription time. Share your personal link and track who signs up or subscribes through it.
1In the bottom menu bar, tap the three dots icon.
2Go to Settings from the menu.
3Tap Invite Friends to open your referral options.
4Copy your referral link to share manually, or share directly via social media, messenger, email, and other apps.
5Tap Track Referrals to see how many people signed up using your link and how many purchased a subscription.
Action
What you can do
Copy referral link
Copy your unique link and send it to anyone in a message, email, or post.
Share directly
Use built-in share options to send your invite through social media, messenger, email, and more.
Track Referrals
See sign-ups from your link and how many referred users bought a subscription.
Earn rewards
Successful referrals can extend your subscription time as you invite more people to ConnectMachine.